
Você já viu dezenas de vídeos sobre Agent Skills. Leu posts, explorou repositórios, talvez até tenha criado uma ou duas. E mesmo assim, na hora de usar num projeto real, o resultado continua genérico, impreciso, frustrante.
O problema não é o conceito. O problema é que a maioria do conteúdo que existe sobre Agent Skills é tão raso quanto as skills que ensina a criar.
Se você já julgou que LLM’s não entregam qualidade suficiente, ou acredita que o código resultante de uma LLM é ruim, se você já passou por isso e ainda não entendeu como skills podem, de fato, mudar a qualidade do que a IA entrega no seu projeto: Esse post é para você.
Antes de tudo, dois fundamentos
Os modelos LLM possuem “todo o conhecimento do mundo”
Essa afirmação é exagerada, mas não da forma como você imagina.
Do ponto de vista de um projeto de software, o volume de conteúdo ingerido na fase de treinamento é vasto o suficiente para construir qualquer coisa mainstream. É mais que suficiente para quase tudo que já fizemos e tudo que ainda vamos fazer no mercado.
Se você não trabalha para uma agência governamental com uma cadeia de pesquisa ultrassecreta, provavelmente tudo que você quer fazer é factível.
e factível de se fazer bem feito com ajuda da IA.
Mas “bem feito” não é um exercício fácil, muito menos barato. Perde-se tempo, gasta-se dinheiro, e o resultado oscila entre o aceitável e o medíocre.
Agent Skills mudaram isso no meu dia a dia. Entender o porquê é o primeiro passo.
Skills são receitas de foco
Um modelo LLM tem conhecimento sobre praticamente tudo, mas justamente por isso, precisa de direcionamento para entregar algo preciso. É como pedir para alguém que sabe cozinhar qualquer coisa preparar “algo bom”: Sem receita, sem ingredientes definidos, sem restrições. O resultado vai ser comestível, mas dificilmente vai ser o que você queria.
Agent Skills são receitas que conduzem o modelo a filtrar o que ele sabe e focar estritamente no que seu projeto precisa. Uma skill pode ser genérica ou absolutamente específica.
E é na especificidade que mora a diferença entre resultado aceitável e resultado preciso.
Skill não é tool, tool não é feature
Uma tool é uma capacidade atômica. Um único comando que o agente consegue executar: rodar um bash, buscar na web, ler um arquivo, fazer uma chamada HTTP. Ferramentas são martelos, serras e furadeiras.
Uma skill é um conjunto de instruções que ensina o agente a orquestrar múltiplas tools para cumprir uma tarefa complexa com qualidade. A skill não dá capacidades novas ao modelo. Ela dá expertise na combinação das capacidades que já existem. Skills são receitas que dizem quais ferramentas usar, em que ordem, e quais erros evitar.
Uma feature é um conceito de produto — algo que o usuário vê e pode ligar ou desligar. “Code Execution”, “Web Search”, “Artifacts” são features. Cada feature é alimentada por uma combinação de tools e skills trabalhando juntas.
A skill do docx, por exemplo, não dá ao Claude a capacidade de criar Word. Ele já consegue. O que ela faz é ensinar que o docx-js usa A4 por padrão, que bullets unicode quebram em certos viewers, que o page size precisa ser explícito. Sem a skill, o resultado é tecnicamente funcional. Com a skill, é profissional.
Exemplos de Skills
Note quão abstrata são as skills mais famosas, ou mais usadas do mercado
---
name: nano-banana-pro
description: Generate or edit images via Gemini 3 Pro Image (Nano Banana Pro).
homepage: https://ai.google.dev/
metadata:
  {
    "openclaw":
      {
        "emoji": "🍌",
        "requires": { "bins": ["uv"], "env": ["GEMINI_API_KEY"] },
        "primaryEnv": "GEMINI_API_KEY",
        "install":
          [
            {
              "id": "uv-brew",
              "kind": "brew",
              "formula": "uv",
              "bins": ["uv"],
              "label": "Install uv (brew)",
            },
          ],
      },
  }
---

# Nano Banana Pro (Gemini 3 Pro Image)

Use the bundled script to generate or edit images.

Generate

```bash
uv run {baseDir}/scripts/generate_image.py --prompt "your image description" --filename "output.png" --resolution 1K
```

Edit (single image)

```bash
uv run {baseDir}/scripts/generate_image.py --prompt "edit instructions" --filename "output.png" -i "/path/in.png" --resolution 2K
```

Multi-image composition (up to 14 images)

```bash
uv run {baseDir}/scripts/generate_image.py --prompt "combine these into one scene" --filename "output.png" -i img1.png -i img2.png -i img3.png
```

API key

- `GEMINI_API_KEY` env var
- Or set `skills."nano-banana-pro".apiKey` / `skills."nano-banana-pro".env.GEMINI_API_KEY` in `~/.openclaw/openclaw.json`

Notes

- Resolutions: `1K` (default), `2K`, `4K`.
- Use timestamps in filenames: `yyyy-mm-dd-hh-mm-ss-name.png`.
- The script prints a `MEDIA:` line for OpenClaw to auto-attach on supported chat providers.
- Do not read the image back; report the saved path only.
#!/usr/bin/env python3
# /// script
# requires-python = ">=3.10"
# dependencies = [
#     "google-genai>=1.0.0",
#     "pillow>=10.0.0",
# ]
# ///
"""
Generate images using Google's Nano Banana Pro (Gemini 3 Pro Image) API.

Usage:
    uv run generate_image.py --prompt "your image description" --filename "output.png" [--resolution 1K|2K|4K] [--api-key KEY]

Multi-image editing (up to 14 images):
    uv run generate_image.py --prompt "combine these images" --filename "output.png" -i img1.png -i img2.png -i img3.png
"""

import argparse
import os
import sys
from pathlib import Path


def get_api_key(provided_key: str | None) -> str | None:
    """Get API key from argument first, then environment."""
    if provided_key:
        return provided_key
    return os.environ.get("GEMINI_API_KEY")


def main():
    parser = argparse.ArgumentParser(
        description="Generate images using Nano Banana Pro (Gemini 3 Pro Image)"
    )
    parser.add_argument(
        "--prompt", "-p",
        required=True,
        help="Image description/prompt"
    )
    parser.add_argument(
        "--filename", "-f",
        required=True,
        help="Output filename (e.g., sunset-mountains.png)"
    )
    parser.add_argument(
        "--input-image", "-i",
        action="append",
        dest="input_images",
        metavar="IMAGE",
        help="Input image path(s) for editing/composition. Can be specified multiple times (up to 14 images)."
    )
    parser.add_argument(
        "--resolution", "-r",
        choices=["1K", "2K", "4K"],
        default="1K",
        help="Output resolution: 1K (default), 2K, or 4K"
    )
    parser.add_argument(
        "--api-key", "-k",
        help="Gemini API key (overrides GEMINI_API_KEY env var)"
    )

    args = parser.parse_args()

    # Get API key
    api_key = get_api_key(args.api_key)
    if not api_key:
        print("Error: No API key provided.", file=sys.stderr)
        print("Please either:", file=sys.stderr)
        print("  1. Provide --api-key argument", file=sys.stderr)
        print("  2. Set GEMINI_API_KEY environment variable", file=sys.stderr)
        sys.exit(1)

    # Import here after checking API key to avoid slow import on error
    from google import genai
    from google.genai import types
    from PIL import Image as PILImage

    # Initialise client
    client = genai.Client(api_key=api_key)

    # Set up output path
    output_path = Path(args.filename)
    output_path.parent.mkdir(parents=True, exist_ok=True)

    # Load input images if provided (up to 14 supported by Nano Banana Pro)
    input_images = []
    output_resolution = args.resolution
    if args.input_images:
        if len(args.input_images) > 14:
            print(f"Error: Too many input images ({len(args.input_images)}). Maximum is 14.", file=sys.stderr)
            sys.exit(1)

        max_input_dim = 0
        for img_path in args.input_images:
            try:
                with PILImage.open(img_path) as img:
                    copied = img.copy()
                    width, height = copied.size
                input_images.append(copied)
                print(f"Loaded input image: {img_path}")

                # Track largest dimension for auto-resolution
                max_input_dim = max(max_input_dim, width, height)
            except Exception as e:
                print(f"Error loading input image '{img_path}': {e}", file=sys.stderr)
                sys.exit(1)

        # Auto-detect resolution from largest input if not explicitly set
        if args.resolution == "1K" and max_input_dim > 0:  # Default value
            if max_input_dim >= 3000:
                output_resolution = "4K"
            elif max_input_dim >= 1500:
                output_resolution = "2K"
            else:
                output_resolution = "1K"
            print(f"Auto-detected resolution: {output_resolution} (from max input dimension {max_input_dim})")

    # Build contents (images first if editing, prompt only if generating)
    if input_images:
        contents = [*input_images, args.prompt]
        img_count = len(input_images)
        print(f"Processing {img_count} image{'s' if img_count > 1 else ''} with resolution {output_resolution}...")
    else:
        contents = args.prompt
        print(f"Generating image with resolution {output_resolution}...")

    try:
        response = client.models.generate_content(
            model="gemini-3-pro-image-preview",
            contents=contents,
            config=types.GenerateContentConfig(
                response_modalities=["TEXT", "IMAGE"],
                image_config=types.ImageConfig(
                    image_size=output_resolution
                )
            )
        )

        # Process response and convert to PNG
        image_saved = False
        for part in response.parts:
            if part.text is not None:
                print(f"Model response: {part.text}")
            elif part.inline_data is not None:
                # Convert inline data to PIL Image and save as PNG
                from io import BytesIO

                # inline_data.data is already bytes, not base64
                image_data = part.inline_data.data
                if isinstance(image_data, str):
                    # If it's a string, it might be base64
                    import base64
                    image_data = base64.b64decode(image_data)

                image = PILImage.open(BytesIO(image_data))

                # Ensure RGB mode for PNG (convert RGBA to RGB with white background if needed)
                if image.mode == 'RGBA':
                    rgb_image = PILImage.new('RGB', image.size, (255, 255, 255))
                    rgb_image.paste(image, mask=image.split()[3])
                    rgb_image.save(str(output_path), 'PNG')
                elif image.mode == 'RGB':
                    image.save(str(output_path), 'PNG')
                else:
                    image.convert('RGB').save(str(output_path), 'PNG')
                image_saved = True

        if image_saved:
            full_path = output_path.resolve()
            print(f"\nImage saved: {full_path}")
            # OpenClaw parses MEDIA tokens and will attach the file on supported providers.
            print(f"MEDIA: {full_path}")
        else:
            print("Error: No image was generated in the response.", file=sys.stderr)
            sys.exit(1)

    except Exception as e:
        print(f"Error generating image: {e}", file=sys.stderr)
        sys.exit(1)


if __name__ == "__main__":
    main()
---
name: blogwatcher
description: Monitor blogs and RSS/Atom feeds for updates using the blogwatcher CLI.
homepage: https://github.com/Hyaxia/blogwatcher
metadata:
  {
    "openclaw":
      {
        "emoji": "📰",
        "requires": { "bins": ["blogwatcher"] },
        "install":
          [
            {
              "id": "go",
              "kind": "go",
              "module": "github.com/Hyaxia/blogwatcher/cmd/blogwatcher@latest",
              "bins": ["blogwatcher"],
              "label": "Install blogwatcher (go)",
            },
          ],
      },
  }
---

# blogwatcher

Track blog and RSS/Atom feed updates with the `blogwatcher` CLI.

Install

- Go: `go install github.com/Hyaxia/blogwatcher/cmd/blogwatcher@latest`

Quick start

- `blogwatcher --help`

Common commands

- Add a blog: `blogwatcher add "My Blog" https://example.com`
- List blogs: `blogwatcher blogs`
- Scan for updates: `blogwatcher scan`
- List articles: `blogwatcher articles`
- Mark an article read: `blogwatcher read 1`
- Mark all articles read: `blogwatcher read-all`
- Remove a blog: `blogwatcher remove "My Blog"`

Example output

```
$ blogwatcher blogs
Tracked blogs (1):

  xkcd
    URL: https://xkcd.com
```

```
$ blogwatcher scan
Scanning 1 blog(s)...

  xkcd
    Source: RSS | Found: 4 | New: 4

Found 4 new article(s) total!
```

Notes

- Use `blogwatcher <command> --help` to discover flags and options.
---
name: acp-router
description: Route plain-language requests for Pi, Claude Code, Codex, OpenCode, Gemini CLI, or ACP harness work into either OpenClaw ACP runtime sessions or direct acpx-driven sessions ("telephone game" flow). For coding-agent thread requests, read this skill first, then use only `sessions_spawn` for thread creation.
user-invocable: false
---

# ACP Harness Router

When user intent is "run this in Pi/Claude Code/Codex/OpenCode/Gemini/Kimi (ACP harness)", do not use subagent runtime or PTY scraping. Route through ACP-aware flows.

## Intent detection

Trigger this skill when the user asks OpenClaw to:

- run something in Pi / Claude Code / Codex / OpenCode / Gemini
- continue existing harness work
- relay instructions to an external coding harness
- keep an external harness conversation in a thread-like conversation

Mandatory preflight for coding-agent thread requests:

- Before creating any thread for Pi/Claude/Codex/OpenCode/Gemini work, read this skill first in the same turn.
- After reading, follow `OpenClaw ACP runtime path` below; do not use `message(action="thread-create")` for ACP harness thread spawn.

## Mode selection

Choose one of these paths:

1. OpenClaw ACP runtime path (default): use `sessions_spawn` / ACP runtime tools.
2. Direct `acpx` path (telephone game): use `acpx` CLI through `exec` to drive the harness session directly.

Use direct `acpx` when one of these is true:

- user explicitly asks for direct `acpx` driving
- ACP runtime/plugin path is unavailable or unhealthy
- the task is "just relay prompts to harness" and no OpenClaw ACP lifecycle features are needed

Do not use:

- `subagents` runtime for harness control
- `/acp` command delegation as a requirement for the user
- PTY scraping of pi/claude/codex/opencode/gemini/kimi CLIs when `acpx` is available

## AgentId mapping

Use these defaults when user names a harness directly:

- "pi" -> `agentId: "pi"`
- "claude" or "claude code" -> `agentId: "claude"`
- "codex" -> `agentId: "codex"`
- "opencode" -> `agentId: "opencode"`
- "gemini" or "gemini cli" -> `agentId: "gemini"`
- "kimi" or "kimi cli" -> `agentId: "kimi"`

These defaults match current acpx built-in aliases.

If policy rejects the chosen id, report the policy error clearly and ask for the allowed ACP agent id.

## OpenClaw ACP runtime path

Required behavior:

1. For ACP harness thread spawn requests, read this skill first in the same turn before calling tools.
2. Use `sessions_spawn` with:
   - `runtime: "acp"`
   - `thread: true`
   - `mode: "session"` (unless user explicitly wants one-shot)
3. For ACP harness thread creation, do not use `message` with `action=thread-create`; `sessions_spawn` is the only thread-create path.
4. Put requested work in `task` so the ACP session gets it immediately.
5. Set `agentId` explicitly unless ACP default agent is known.
6. Do not ask user to run slash commands or CLI when this path works directly.

Example:

User: "spawn a test codex session in thread and tell it to say hi"

Call:

```json
{
  "task": "Say hi.",
  "runtime": "acp",
  "agentId": "codex",
  "thread": true,
  "mode": "session"
}
```

## Thread spawn recovery policy

When the user asks to start a coding harness in a thread (for example "start a codex/claude/pi/kimi thread"), treat that as an ACP runtime request and try to satisfy it end-to-end.

Required behavior when ACP backend is unavailable:

1. Do not immediately ask the user to pick an alternate path.
2. First attempt automatic local repair:
   - ensure plugin-local pinned acpx is installed in `extensions/acpx`
   - verify `${ACPX_CMD} --version`
3. After reinstall/repair, restart the gateway and explicitly offer to run that restart for the user.
4. Retry ACP thread spawn once after repair.
5. Only if repair+retry fails, report the concrete error and then offer fallback options.

When offering fallback, keep ACP first:

- Option 1: retry ACP spawn after showing exact failing step
- Option 2: direct acpx telephone-game flow

Do not default to subagent runtime for these requests.

## ACPX install and version policy (direct acpx path)

For this repo, direct `acpx` calls must follow the same pinned policy as the `@openclaw/acpx` extension.

1. Prefer plugin-local binary, not global PATH:
   - `./extensions/acpx/node_modules/.bin/acpx`
2. Resolve pinned version from extension dependency:
   - `node -e "console.log(require('./extensions/acpx/package.json').dependencies.acpx)"`
3. If binary is missing or version mismatched, install plugin-local pinned version:
   - `cd extensions/acpx && npm install --omit=dev --no-save acpx@<pinnedVersion>`
4. Verify before use:
   - `./extensions/acpx/node_modules/.bin/acpx --version`
5. If install/repair changed ACPX artifacts, restart the gateway and offer to run the restart.
6. Do not run `npm install -g acpx` unless the user explicitly asks for global install.

Set and reuse:

```bash
ACPX_CMD="./extensions/acpx/node_modules/.bin/acpx"
```

## Direct acpx path ("telephone game")

Use this path to drive harness sessions without `/acp` or subagent runtime.

### Rules

1. Use `exec` commands that call `${ACPX_CMD}`.
2. Reuse a stable session name per conversation so follow-up prompts stay in the same harness context.
3. Prefer `--format quiet` for clean assistant text to relay back to user.
4. Use `exec` (one-shot) only when the user wants one-shot behavior.
5. Keep working directory explicit (`--cwd`) when task scope depends on repo context.

### Session naming

Use a deterministic name, for example:

- `oc-<harness>-<conversationId>`

Where `conversationId` is thread id when available, otherwise channel/conversation id.

### Command templates

Persistent session (create if missing, then prompt):

```bash
${ACPX_CMD} codex sessions show oc-codex-<conversationId> \
  || ${ACPX_CMD} codex sessions new --name oc-codex-<conversationId>

${ACPX_CMD} codex -s oc-codex-<conversationId> --cwd <workspacePath> --format quiet "<prompt>"
```

One-shot:

```bash
${ACPX_CMD} codex exec --cwd <workspacePath> --format quiet "<prompt>"
```

Cancel in-flight turn:

```bash
${ACPX_CMD} codex cancel -s oc-codex-<conversationId>
```

Close session:

```bash
${ACPX_CMD} codex sessions close oc-codex-<conversationId>
```

### Harness aliases in acpx

- `pi`
- `claude`
- `codex`
- `opencode`
- `gemini`
- `kimi`

### Built-in adapter commands in acpx

Defaults are:

- `pi -> npx pi-acp`
- `claude -> npx -y @zed-industries/claude-agent-acp`
- `codex -> npx @zed-industries/codex-acp`
- `opencode -> npx -y opencode-ai acp`
- `gemini -> gemini`
- `kimi -> kimi acp`

If `~/.acpx/config.json` overrides `agents`, those overrides replace defaults.

### Failure handling

- `acpx: command not found`:
  - for thread-spawn ACP requests, install plugin-local pinned acpx in `extensions/acpx` immediately
  - restart gateway after install and offer to run the restart automatically
  - then retry once
  - do not ask for install permission first unless policy explicitly requires it
  - do not install global `acpx` unless explicitly requested
- adapter command missing (for example `claude-agent-acp` not found):
  - for thread-spawn ACP requests, first restore built-in defaults by removing broken `~/.acpx/config.json` agent overrides
  - then retry once before offering fallback
  - if user wants binary-based overrides, install exactly the configured adapter binary
- `NO_SESSION`: run `${ACPX_CMD} <agent> sessions new --name <sessionName>` then retry prompt.
- queue busy: either wait for completion (default) or use `--no-wait` when async behavior is explicitly desired.

### Output relay

When relaying to user, return the final assistant text output from `acpx` command result. Avoid relaying raw local tool noise unless user asked for verbose logs.
Escolhi 3 exemplos super expressivos:
acp-router
Esse skill é um roteador para o “OpenClaw” que intercepta pedidos do tipo “rode isso no Claude Code / Codex / Gemini / Pi / OpenCode / Kimi” e os encaminha para sessões ACP (Agent Communication Protocol) em vez de usar scraping de terminal ou subagentes genéricos.
Em resumo, ele faz três coisas:
- Detecta a intenção de usar um coding agent externo (Pi, Claude Code, Codex, etc.) e mapeia o nome para um
agentIdpadronizado. - Escolhe o caminho de execução: ou via runtime ACP nativo do OpenClaw (
sessions_spawn), ou via CLIacpxdiretamente (o “telephone game”, onde o OpenClaw repassa prompts para o harness e devolve as respostas). - Gerencia ciclo de vida: criação de sessões persistentes com nomes determinísticos, recuperação automática quando o backend ACP falha (reinstala o
acpxlocal, reinicia o gateway, tenta de novo), e fallback ordenado só se tudo falhar.
Basicamente é a cola que permite ao OpenClaw orquestrar múltiplos agentes de código externos de forma padronizada, sem que o usuário precise lidar com CLI ou comandos manuais.
Se não faz ideia do que seja ACP, estamos falando de Agent Communication Protocol saiba mais.
blogwatcher
Essa skill é um wrapper para o CLI blogwatcher — uma ferramenta em Go que monitora blogs e feeds RSS/Atom.
Ela permite ao agente adicionar blogs para acompanhar, escanear por novos posts, listar artigos encontrados e marcá-los como lidos, tudo via linha de comando. É basicamente um leitor de RSS minimalista operado pelo agente, útil para ficar de olho em atualizações de blogs técnicos ou qualquer fonte com feed.
nano-banana-pro
Essa skill é um wrapper para geração e edição de imagens usando o Gemini 3 Pro (codinome interno “Nano Banana Pro”).
Ela expõe um script Python (rodado via uv) que aceita prompts de texto para gerar imagens do zero, editar uma imagem existente com instruções, ou compor múltiplas imagens (até 14) numa cena só. Suporta resoluções de 1K a 4K e usa a API key do Gemini. O agente só precisa informar o prompt e o nome do arquivo de saída.
A aparente simplicidade dos exemplos esconde o ponto central. O modelo já sabe o que é uma CLI, sabe interagir com um MCP, sabe chamar tools, sabe executar projetos .NET, Python, Node. Tudo que a skill precisa dizer é como, diante da vastidão de conhecimento, executar estritamente aquela operação para cumprir a tarefa. Skills são mecanismos de foco, de atenção, de redução de escopo.
É aqui que a mágica acontece
Embora o modelo seja treinado com código bom, código médio, mas potencialmente majoritariamente com código ruim, você consegue entregar, via skills tudo que o modelo precisa para realizar, no detalhe, com perfeição:
- Da forma como você deseja
- Com o nível de detalhe que você precisa.
- Independente do que você esteja fazendo
Skill não é sinônimo de arquivo markdown
A maioria dos exemplos que circulam por aí são arquivos .md com instruções em linguagem natural. É o formato mais comum, mas não é o único.
Uma skill é, no fundo, expertise codificada sobre como executar uma tarefa bem. Essa expertise pode viver em vários formatos:
- um arquivo markdown com instruções
- um script Python que executa a tarefa diretamente
- um JSON schema
- um conjunto de exemplos de input/output
- ou uma combinação de tudo isso.
Markdown funciona bem quando a tarefa envolve ambiguidade e julgamento, quando você precisa que o modelo raciocine sobre o que fazer. Scripts diretos funcionam melhor quando você precisa de execução determinística, sem variação, toda vez. Na prática, o design mais robusto é híbrido: um script que faz o trabalho pesado, com um markdown que ensina o agente quando invocar e como interpretar os resultados.
Como eu descobri isso?
Embora eu só tenha de fato entrado de cabeça para usar IA agora em FEV/2026, em outubro 16/OUT com o lançamento das Claude Skills, agora Agent Skills, ficou claro que era possível assumir o controle, com precisão, do resultado.
De fato eu não tenho muito interesse em que a IA faça o que eu não sei fazer,
eu quero que ela faça o que eu sei fazer,
de forma mais rápida e mais eficiente,
de tal forma que eu possa corrigir, mas nunca perder o controle.
Controle é a palavra-chave que explica Skills.
Sempre foi claro para mim, que por melhor que fossem os prompts, a codebase não era suficiente para expressar o padrão ou as intenções, em especial quando se trata de microsserviço, com um nível de automação e infraestrutura elevado.
Quando se alimenta débitos técnicos, pior ainda.
E é essa minha realidade atual.
A IA é o braço para saná-los. Mas como ensiná-la a fazer certo? Ou ignorando certo ou errado, como fazer da forma exata e precisa que eu quero?
Agent Skills parecia a resposta que queria que caísse dos céus.
E de fato era!
O mercado escolheu falar e criar skills tão rasas quanto o próprio conhecimento
O título desse post é provocativo intencionalmente. A maior parte do que vemos no youtube, a maior parte das skills da comunidade, dos repositórios, são skills absolutamente superficiais.
Ao invés de codificar expertise concreta, elas dizem “Faça da melhor forma seguindo os melhores padrões”. Nesse momento, você delegou ao modelo a descoberta de qual padrão se aplica, e o resultado vai refletir a média do treinamento, não a sua intenção. A skill deixou de ser uma receita e virou um pedido genérico ao chef. O modelo não ganhou expertise nenhuma. Ganhou liberdade para improvisar, que é exatamente o oposto do que você queria.
E o que é “boa prática”?!
Nem todo mundo foi por essa linha, a skill nano-banana-pro, do exemplo acima, por exmemplo, aprofunda no detalhe, trazendo inclusive um script python para ser chamado. Isso é controle!
Não é preciso detalhar tudo, mas é importante saber que é possível, que tem como. O óbvio não precisa ser detalhado, mas toda vez que você quer assumir o controle, detalhar se torna fundamental.
E tem um problema que vai além da superficialidade do conteúdo: o triggering. Uma skill pode ser tecnicamente excelente, mas se a description for vaga, o agente simplesmente não vai invocá-la. Ele não vai reconhecer que aquela skill se aplica ao contexto atual. A description de uma skill não é um resumo para humanos — é uma instrução de matching para o modelo. Precisa ser específica o suficiente para que o agente identifique, sem ambiguidade, quando usá-la. Esse é mais um ponto que o conteúdo raso não ensina.
Exemplo – API Gateway
Vou detalhar até que ponto conseguimos entregar detalhes para a IA.
Conexto
Meu primeiro contato real, e intencional com os Code Agents se deu depois de meses de projeto, há praticamente 2 meses de entrar em produção.
A demanda por automação
O projeto tem muita coisa que foge ao padrão dos projetos que encontramos nas empresas daqui do Brasil e em especial no github.
Por acaso, por se tratar de um projeto cloud native, nos moldes do que eu faço e falo há anos, endereça também soluções para as críticas que faço aqui no gago.io, motivo que fez fazer parte do projeto.
Entre outras coisas, nesse tipo de projeto (criação de plataforma), a aplicação precisa tocar na infraestrutura para reconfigurar a infraestrutura em virtude de operações de negócio.
Porque não é concebível ou aceitável que em pleno 2026 quando um cliente é cadastrado na plataforma e cria uma API Key, um humano precise apertar um botão para aplicar essa api key no api gateway.
Imagina se cada vez que você cria uma API Key na Anthropic, OpenAI, Google, Microsoft, um humano precisasse replicar isso no gateway via algum tipo de botão ou script.
Na visão de produto, é inaceitável.
- A criação da API KEY
- A sincronização com o API SIX
- A criação do container do cliente
todas essas tarefas devem acontecer em multiplos datacenters, ao vivo, instantaneamente, e automaticamente, sem humanos como gargalo.
Apache APISIX
Como API Gateway, dessa vez saí do clássico Kong/Konga e optei pelo Apache APISIX e foi a melhor mudança que fiz nos últimos anos.
- Apache APISIX não possui plugins pagos, todos são gratuitos, diferente do Kong,
- É mantido sob a guarda da Apache Software Foundation
Esses foram os principais elementos que me fizeram dar uma chance, ainda no Academia Pay, e deu muito certo!
Como esse foi meu primeiro projeto depois do Academia Pay, fez muito sentido adotá-lo aqui.
As operações básicas de subida da infra acontecem via curl configurados como job no kubernetes. Já na máquina local do dev, um container dos vários do docker compose faz a tarefa.
Mas uma perna precisa ser dinâmica: A criação das API Keys. Essa tarefa não é um curl que resolve é a aplicação então resolvi estruturar isso de forma correta e daí nasce:
- Interface para o Refit
- DTO’s e mais DTO’s…
Bom, está claro que estamos diante de algo customizado, algo feito sob demanda para um problema específico de um projeto peculiar de plataforma.
Algo que não está no treinamento do modelo. Não exatamente como fizemos aqui.
Criando Agent Skills
Uma vez que você tem uma arquitetura funcional, pedir para o claude code construir uma skill é muito fácil. Eu criei um prompt com as documentações de Skills de todos os principais providers de agentes.
- https://agentskills.io/home
- https://platform.claude.com/docs/en/agents-and-tools/agent-skills/overview
- https://developers.openai.com/codex/skills/
- https://manus.im/pt-br/features/agent-skills
- https://learn.microsoft.com/en-us/agent-framework/agents/skills
- https://code.visualstudio.com/docs/copilot/customization/agent-skills
- https://opencode.ai/docs/skills/
- https://cursor.com/pt-BR/docs/skills
(na época a lista era bem menor, 5 links, sendo 2 da agentskills.io e 2 da platform.claude.com)
Eu fiz o trabalho de ir ao google, achar os principais links que explicam Agent Skills, e pedi para, com base na codebase e na documentação, criar skills para essa integração e esse foi o resultado.
---
name: apisix-gateway
description: Configure and manage ApiSix gateway for API authentication, rate limiting, and consumer management. Use when working with API keys, rate limits, or gateway configuration.
context: fork
agent: Explore
---
## Overview

ApiSix is the API gateway that sits in front of xxxxxxxxxx, handling authentication via API keys, rate limiting, and request transformation. Consumers (representing API keys) are automatically synchronized from xxxxxxxxxx's database to ApiSix via the Event Driven Architecture.
## When to Use This Skill

Use this skill when:
- Configuring new API routes in ApiSix
- Troubleshooting 401/429 errors
- Understanding API key authentication flow
- Modifying rate limiting behavior
- Adding new plugins to routes
- Managing consumers manually
## Architecture Overview

```
┌─────────────────────────────────────────────────────────────────────────────┐
│ API Request with X-API-Key header                                           │
└─────────────────────────────────────────────────────────────────────────────┘
                                     ↓
┌─────────────────────────────────────────────────────────────────────────────┐
│ ApiSix Gateway (Port 7777)                                                  │
│                                                                             │
│ ┌─────────────────┐  ┌─────────────────┐  ┌─────────────────┐               │
│ │   key-auth      │→ │   limit-count   │→ │ attach-consumer │               │
│ │   plugin        │  │   plugin        │  │ -label plugin   │               │
│ └─────────────────┘  └─────────────────┘  └─────────────────┘               │
│                                                                             │
│ Validates API key    Checks rate limit   Injects consumer                   │
│ Loads consumer       per consumer        labels as headers                  │
└─────────────────────────────────────────────────────────────────────────────┘
                                     ↓
┌─────────────────────────────────────────────────────────────────────────────┐
│ xxxxxxxxxx API (Port 8080)                                                   │
│                                                                             │
│ Receives headers:                                                           │
│ - X-Consumer-Account-Id                                                     │
│ - X-Consumer-Organization-Id                                                │
│ - X-Consumer-Role                                                           │
│ - X-Consumer-Api-Key-Id                                                     │
│ - X-Request-Id                                                              │
└─────────────────────────────────────────────────────────────────────────────┘
```
## Key Configuration Files

```
compose/apisix/
├── apisix_conf/
│   └── config.yaml          # Base ApiSix configuration
├── apisix-configurer/
│   └── api.sh               # Route and plugin setup scripts
└── docker-compose.yaml      # Local development
```
## Consumer Synchronization Flow

Consumers are automatically managed via Event Driven Architecture:

```
ApiKey Created/Updated/Deleted in xxxxxxxxxx
              ↓
Event: apikey.{created|changed|deleted}
              ↓
Queue: events.apikey.{event}.flow.work
              ↓
Command: sync-api-key-on-gateway
              ↓
Queue: commands.sync-api-key-on-gateway.work
              ↓
Worker calls IApiSix.CreateConsumerAsync() / DeleteConsumerAsync()
              ↓
ApiSix Admin API: PUT /apisix/admin/consumers/{username}
```
## Consumer Structure

### Labels (Metadata)

```csharp
public class Labels
{
    public string ApiKeyId { get; set; }
    public string AccountId { get; set; }
    public string AccountName { get; set; }
    public string OrganizationId { get; set; }
    public string OrganizationName { get; set; }
    public string Role { get; set; }      // "Account", "Organization", "System"
    public string Region { get; set; }    // "default"
}
```

### Plugins

```csharp
public class Plugins
{
    [JsonPropertyName("key-auth")]
    public KeyAuthConsumerPlugin KeyAuth { get; set; }

    [JsonPropertyName("limit-count")]
    public LimitCountConsumerPlugin LimitCount { get; set; }
}

public class KeyAuthConsumerPlugin
{
    [JsonPropertyName("key")]
    public string ApiKey { get; set; }  // The raw API key value
}

public class LimitCountConsumerPlugin
{
    [JsonPropertyName("count")]
    public int Count { get; set; }       // Requests allowed

    [JsonPropertyName("time_window")]
    public int TimeWindow { get; set; }  // Time window in seconds

    [JsonPropertyName("rejected_code")]
    public int RejectedCode { get; set; } = 429;

    [JsonPropertyName("key")]
    public string Key { get; set; } = "remote_addr";
}
```
## API Key Format

xxxxxxxxxx API keys follow this format:

```
{sys|org|acc}_xxxxxxxxxxxxxxxxxxxxxxxxxxxx

Prefix: sys_ – System-level API Key
        org_ – Organization-level API Key
        acc_ – Account-level API Key
Key:    32 random alphanumeric characters
Total:  36 characters
```
### Create/Update Consumer

```csharp
app.MapQueue("commands.sync-api-key-on-gateway.work", async (
    [FromBody] GenericCommand currentCommand,
    [FromServices] IApiKeyRepository apiKeyRepository,
    [FromServices] IApiSix apiSix,
    [FromServices] ILogger<Program> logger) =>
{
    var apiKeyId = currentCommand.GetMetadata<Guid>(nameof(ApiKey.ApiKeyId));
    var eventName = currentCommand.GetMetadata<string>("EventName");

    if (eventName == "deleted")
    {
        // Delete consumer
        await apiSix.DeleteConsumerAsync(apiKeyId.ToString("N"));
        logger.LogInformation("Consumer deleted: {ApiKeyId}", apiKeyId);
        return AmqpResults.Ack();
    }

    // Load ApiKey with related entities
    var apiKey = await apiKeyRepository.GetOneAsync(apiKeyId);

    if (apiKey == null)
    {
        logger.LogWarning("ApiKey not found: {ApiKeyId}", apiKeyId);
        return AmqpResults.Nack(false);  // Nack requeue=false to avoid reprocessing
    }

    // Create/Update consumer
    await apiSix.CreateConsumerAsync(new ApiSixCreateConsumerRequest()
    {
        Username = apiKey.ApiKeyId.ToString("N"),
        Labels = new Labels(){ ... },
        Plugins = new Plugins { ... }
    });

    logger.LogInformation(
        "Consumer synced: {ApiKeyId}, Role: {Role}, Limit: {Limit}/{Seconds}s",
        apiKeyId,
        apiKey.Account != null ? "Account" : "Organization",
        apiKey.ResourcePlan.Limit,
        apiKey.ResourcePlan.Seconds);

    return AmqpResults.Ack();
})
.WithSafeRunnerConnection("rabbitmq_events")
.WithDispatchConcurrency(1)
.WithPrefetch(1);
```
## IApiSix Interface

**File:** `Infrastructure/ApiSix/IApiSix.cs`

```csharp
public interface IApiSix
{
    [Put("/apisix/admin/consumers/{username}")]
    Task<ApiSixResponse> CreateConsumerAsync(
        [AliasAs("username")] string username,
        [Body] ApiSixCreateConsumerRequest request);

    [Delete("/apisix/admin/consumers/{username}")]
    Task<ApiSixResponse> DeleteConsumerAsync(
        [AliasAs("username")] string username);

    [Get("/apisix/admin/consumers/{username}")]
    Task<ApiSixConsumerResponse> GetConsumerAsync(
        [AliasAs("username")] string username);

    [Get("/apisix/admin/consumers")]
    Task<ApiSixConsumersListResponse> ListConsumersAsync();
}
```
## Route Configuration

**File:** `compose/apisix/apisix-configurer/api.sh`

```bash
#!/bin/bash

ADMIN_KEY="${APISIX_ADMIN_KEY:-xxxxxxxxxxxxxxxxxxxxxxxxxx}"
APISIX_HOST="${APISIX_HOST:-http://apisix:9180}"

# Wait for ApiSix to be ready
until curl -s "${APISIX_HOST}/apisix/status" > /dev/null; do
    echo "Waiting for ApiSix..."
    sleep 2
done

# Create main API route
curl -X PUT "${APISIX_HOST}/apisix/admin/routes/xxxxxxxxxx-api" \
    -H "X-API-KEY: ${ADMIN_KEY}" \
    -H "Content-Type: application/json" \
    -d '{
    "uri": "/api/*",
    "name": "xxxxxxxxxx API",
    "upstream": {
        "type": "roundrobin",
        "nodes": {
            "xxxxxxxxxx-api:8080": 1
        },
        "timeout": {
            "connect": 5,
            "send": 60,
            "read": 60
        }
    },
    "plugins": {
        "key-auth": {
            "header": "X-API-Key",
            "hide_credentials": true
        },
        "request-id": {
            "header_name": "X-Request-Id",
            "include_in_response": true,
            "algorithm": "uuid"
        },
        "limit-req": {
            "rate": 1000,
            "burst": 500,
            "rejected_code": 429,
            "key_type": "consumer_name"
        },
        "proxy-rewrite": {
            "headers": {
                "set": {
                    "X-Forwarded-Host": "$host"
                }
            }
        },
        "attach-consumer-label": {
            "headers": [
                "X-Consumer-Account-Id:accountId",
                "X-Consumer-Account-Name:accountName",
                "X-Consumer-Organization-Id:organizationId",
                "X-Consumer-Organization-Name:organizationName",
                "X-Consumer-Role:role",
                "X-Consumer-Api-Key-Id:apiKeyId",
                "X-Consumer-Region:region"
            ]
        }
    }
}'

echo "Route configured successfully"
```
## Base Configuration

**File:** `compose/apisix/apisix_conf/config.yaml`

```yaml
apisix:
  node_listen: 7777
  enable_admin: true
  admin_key:
    - name: admin
      key: xxxxxxxxxxxxxxxxxxxxxxxxxx
      role: admin

etcd:
  host:
    - "http://etcd:2379"
  prefix: "/apisix"
  timeout: 30

plugins:
  - key-auth
  - limit-count
  - limit-req
  - request-id
  - proxy-rewrite
  - attach-consumer-label

plugin_attr:
  log-rotate:
    interval: 3600
    max_kept: 168
```
## Debugging ApiSix
### Check Consumer Exists

```bash
# List all consumers
curl -s http://apisix:9180/apisix/admin/consumers \
    -H "X-API-KEY: $ADMIN_KEY" | jq '.list[] | {username, labels}'

# Get specific consumer
curl -s http://apisix:9180/apisix/admin/consumers/{apiKeyId} \
    -H "X-API-KEY: $ADMIN_KEY" | jq
```

### Test Authentication

```bash
# Test valid API key
curl -v https://api.xxxxxxxxxx.io/api/health \
    -H "X-API-Key: mfy_xxxxxxxxxxxxx"

# Check response headers
# - X-Request-Id: generated
# - X-RateLimit-Limit: from consumer
# - X-RateLimit-Remaining: requests left
```

### Check Rate Limit Status

```bash
# Multiple requests to trigger rate limit info
for i in {1..5}; do
    curl -s -I https://api.xxxxxxxxxx.io/api/health \
        -H "X-API-Key: mfy_xxxxxxxxxxxxx" | grep -i ratelimit
done
```

### View ApiSix Logs

```bash
# Docker logs
docker logs apisix --tail 100 -f

# Access log
docker exec apisix tail -f /usr/local/apisix/logs/access.log

# Error log
docker exec apisix tail -f /usr/local/apisix/logs/error.log
```
## Common Issues

### 401 Unauthorized

**Causes:**
- API key not found in header
- Consumer not synchronized to ApiSix
- Invalid API key format

**Debug:**
```bash
# Check header is being sent
curl -v ... -H "X-API-Key: mfy_xxx"

# Check consumer exists
curl http://apisix:9180/apisix/admin/consumers -H "X-API-KEY: $ADMIN_KEY"

# Check event processing
rabbitmqadmin get queue=commands.sync-api-key-on-gateway.work count=10
```

### 429 Too Many Requests

**Causes:**
- Rate limit exceeded
- ResourcePlan has low limits
- Multiple clients sharing same API key

**Debug:**
```bash
# Check rate limit headers
curl -I ... | grep RateLimit

# Check consumer's limit-count config
curl http://apisix:9180/apisix/admin/consumers/{id} | jq '.plugins.limit-count'

# Check ResourcePlan in database
SELECT * FROM resource_plans WHERE resource_plan_id = '...';
```

### Missing X-Consumer-* Headers

**Causes:**
- Consumer labels not set
- attach-consumer-label plugin not configured
- Plugin mapping incorrect

**Debug:**
```bash
# Check consumer labels
curl http://apisix:9180/apisix/admin/consumers/{id} | jq '.labels'

# Check route plugins
curl http://apisix:9180/apisix/admin/routes | jq '.list[] | .plugins["attach-consumer-label"]'
```
## Adding New Routes

### Webhook Route (No Auth)

```bash
curl -X PUT "${APISIX_HOST}/apisix/admin/routes/webhooks" \
    -H "X-API-KEY: ${ADMIN_KEY}" \
    -d '{
    "uri": "/webhooks/*",
    "upstream": {
        "type": "roundrobin",
        "nodes": {
            "xxxxxxxxxx-api:8080": 1
        }
    },
    "plugins": {
        "request-id": {}
    }
}'
```

### Health Check Route (No Auth)

```bash
curl -X PUT "${APISIX_HOST}/apisix/admin/routes/health" \
    -H "X-API-KEY: ${ADMIN_KEY}" \
    -d '{
    "uri": "/health/*",
    "upstream": {
        "type": "roundrobin",
        "nodes": {
            "xxxxxxxxxx-api:8080": 1
        }
    },
    "plugins": {}
}'
```
## ResourcePlan Examples

| Plan         | Limit     | Seconds | Description           |
|--------------|-----------|---------|-----------------------|
| Free         |       100 |      60 |           100 req/min |
| Starter      |       500 |      60 |           500 req/min |
| Pro          |      2000 |      60 |          2000 req/min |
| Enterprise   |     10000 |      60 |         10000 req/min |
| Unlimited    |   1000000 |       1 | Effectively unlimited |

## Related Skills

- `event-driven-administration` - How consumers are synchronized
- `infrastructure-architecture` - Full infrastructure flow
- `add-api-endpoint` - Creating protected endpoints
- `debug-issue` - General debugging

## Related Documentation

- `message-flow/references/INFRASTRUCTURE_LAYER.md` - Infrastructure details
- `compose/apisix/` - Configuration files
- Apache APISIX Documentation: https://apisix.apache.org/docs/
Essse é o nível de especificidade que é possível alcançar.
Coisas importantes
Skill e MCP resolvem problemas diferentes
Se seu agente já se conecta a fontes de dados via MCP, a pergunta natural é: por que preciso de skills?
MCP é infraestrutura. Ele expõe dados e serviços, acesso a bancos, APIs, logs, sistemas internos. MCP é a cozinha profissional: fornece os ingredientes, os utensílios, os equipamentos.
Skills são orquestração. Elas definem como o agente deve usar os dados que o MCP entrega para produzir algo de valor. Skills são as receitas que dizem o que fazer com os ingredientes.
Na prática, o design que funciona é: acesso a dados, APIs e retrieval como tools (ou capacidades MCP); lógica de decisão e workflows como skills. A skill do APISIX no exemplo acima é exatamente isso: ela não acessa o APISIX diretamente, ela ensina o agente a orquestrar chamadas Refit, interpretar o fluxo de filas e compor consumers com a estrutura correta.
Eu não criei essa skill sozinho
Essa skill foi criada usando o próprio claude code.
Eu pedi para que analisasse a codebase, enviei links quie explicavam o que eram Agent Skills e qual formato desejado e pronto.
Detalhes específicos dessa arquitetura
Muitos pontos foram respeitados e detalhados.
- Refit
- Escolha dos plugins
- Escolha da estratégia de configuração.
- Ausência de try/catchs
- Uso do Oragon.RabbitMQ
- Entendimento do fluxo completo de filas (uma cadeia de 3 passos)
O fato de que um modelo de linguagem é capaz de olhar minha codebase e produzir essa explicação, já é tãoi admirável quanto assustador.
Considerar que esse arquivo é como um cache, uma memória, que evita a descoberta, e que será usado e respeitado para novas operações, é ainda mais aterrorisante quanto empolgante.
Claro, escolhi o apisix para esse post pois é um assunto limpo do viés da arquitetura adotada no projeto. É um exemplo pouco opinativo.
Quase todo projeto, dos do tipo que eu pego, e da maioria avassaladora dos leitores do gago.io são projetos que demandam API Gateways, sejam eles internos, dento da empresa, entre aplicações, ou externo, para o acesso púiblico, portanto esse assunto é parte do dia-a-dia.
Ao todo foram 31 skills, algumas inclusive com resource, todos construídos com ajuda do Claude Code para serem usados pelo Claude Code com base em fragmentos da codebase.
O poder que as skills entregam para o agente são ilimitados. Permitindo inclusive o direcionamento das decisões.

ou especificações do que são consideradas boas práticas no seu projeto:
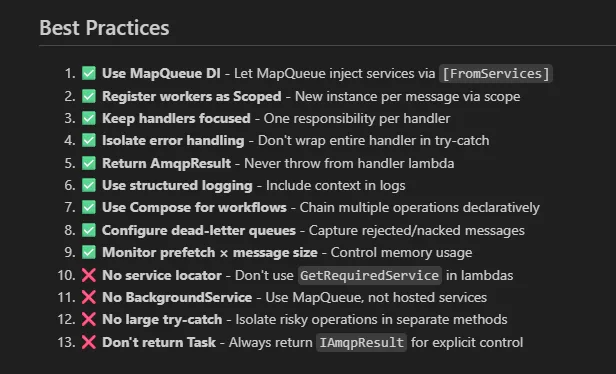
esses 2 prints são prints da skill do Oragon.RabbitMQ no projeto. Se quiser ver mais exemplos, como o do Oragon.RabbitMQ, comenta aqui.
De coração espero que seu entendimento sobre agent skills tenha evoluído.
Me conte, mudou sua percepção sobre Agent Skills?


Eu estou agora procurando entrar no fluxo de uso de IA e esse post me deu bastante segurança pra experimentar usar IA em um projeto que já tem 10 anos, começou com .Net Framework, foi migrado pra .Net 9 pela equipe, e está hoje no .Net 10, mas com vários pontos de oportunidade pra evolução na arquitetura, organização do código e principalmente inclusão de testes.
Principalmente pela parte de arquitetura e organização do código, eu estava reticente em usar IA por achar que ela não conseguiria “ler” a arquitetura/organização atual e conseguir ajudar a implementar a parte repetitiva e braçal do código, por exemplo ao criar uma nova entidade, ou alterar uma existente incluindo atributos e evoluindo todo o fluxo que use esta entidade, desde o banco até DTOs, View Models, e o front-end. Seu exemplo me deu um caminho pra experimentar. Usar IA para entender o projeto atual, criar skills pra guiar evoluções e manutenções, propor melhorias na arquitetura e código e por fim, apoiar na criação de testes em cima do código refatorado.
Ela não faz isso sozinha, existe engenharia para fazer com que ela se encontre.
Mas é perfeitamente possível e plausível, e não custa tanto assim, em 1 semana é possível fazer esse tipo de acerto em projetos médios e pequenos.